If you have bought a domain name, such as myawesomedomain.com, you would know that it will require a SSL certificate for HTTPS connection. However, the SSL certificate is an additional cost that requires renewal each year.
For a Namecheap domain, a one-year PositiveSSL certificate costs about $10, which is almost the same cost as the domain name itself. Fortunately, there is an alternative where you can manually install a 90-day SSL certificate from Let’s Encrypt certbot at zero cost.
Requirement
- cPanel console access
certbotcert.pemprivkey.pem
Install SSL certificate and private key with cPanel console
This section requires both the files privkey.pem and cert.pem. If you don’t have these files, you can generate them in the next section.
-
Navigate to your cPanel > Security > SSL/TLS > INSTALL AND MANAGE SSL FOR YOUR SITE (HTTPS) > Manage SSL sites
-
Select a Domain >
myawesomedomain.com (+ subdomains: mail, www, ...) -
In the
Certificate: (CRT)field, copy and paste the contents of yourcertificate.pem. -
In the
Private Key (KEY)field, copy and paste the contents of yourprivate_key.pem. -
In the
Certificate Authority Bundle: (CABUNDLE)field, leave it as blank (default). -
Click
Install Certificate. -
Navigate to your cPanel > Security > SSL/TLS Status
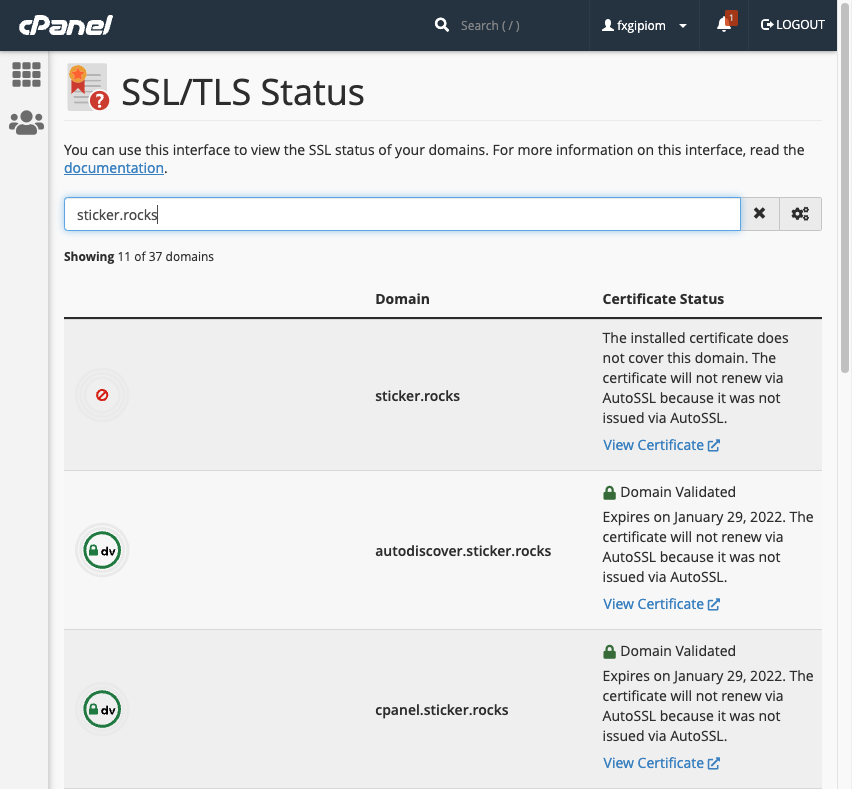
This displays a list of domains and subdomains that are managed by cPanel and their certificate status. We use a wildcard, such as *.myawesomedomain.com, when generating a SSL certificate to avoid repetition.
Generate a SSL certificate and private key with certbot
A simple web application needs to be developed with generated token in order to accept the challenge (domain verification) by Let’s Encrypt server. The new method, DNS challenge, drastically simplifies the verification process to get or to renew the certificate.
Step 1 - Install certbot
brew install certbot
Step 2 - Generate new certificate using certbot
You can generate the certificate for a single domain, or for multiple domains (using wildcards). In this case, I used *.myawesomedomain.com so that the certificate can be used for subdomains as well.
sudo certbot certonly --manual --preferred-challenges dns -d "*.myawesomedomain.com"
The wizard will revert with a DNS TXT record that must be deployed before you can continue.
Requesting a certificate for *.myawesomedomain.com

- - - - - - - - - - - - - - - - - - - - - - - - - - - - - - - - - - - - - - - -
Please deploy a DNS TXT record under the name:

_acme-challenge.myawesomedomain.com.

with the following value:

ssalkdfj39823j4lisdr02948u0owtguj209345u209

Before continuing, verify the TXT record has been deployed. Depending on the DNS
provider, this may take some time, from a few seconds to multiple minutes. You can
check if it has finished deploying with aid of online tools, such as the Google
Admin Toolbox: https://toolbox.googleapps.com/apps/dig/#TXT/_acme-challenge.myawesomedomain.com.
Look for one or more bolded line(s) below the line ';ANSWER'. It should show the
value(s) you've just added.

- - - - - - - - - - - - - - - - - - - - - - - - - - - - - - - - - - - - - - - -
Press Enter to Continue
Step 3 - Deploy DNS TXT record in Namecheap
- Navigate to Namecheap console > Dashboard >
myawesomedomain.com> Manage - Navigate to Domain > Ensure Nameservers is
Namecheap BasicDNS - Navigate to Advanced DNS > ADD NEW RECORD
a. Enter TypeTXT Record
b. Enter Host_acme-challenge
c. Enter Valuessalkdfj39823j4lisdr02948u0owtguj209345u209
d. Enter TTL1 minor60(seconds) - Verify this
DNS TXTrecord usingnslookup. Depending on the DNS
provider, this may take some time, from a few seconds to multiple minutes.
nslookup -type=TXT _acme-challenge.myawesomedomain.com
Address:	192.168.86.1#53

Non-authoritative answer:
_acme-challenge.myawesomedomain.com	text = "ssalkdfj39823j4lisdr02948u0owtguj209345u209"

Authoritative answers can be found from:
Setting TTL to 1 min to allow top-level DNS servers to pick up this new subdomain, acme-challenge.myawesomedomain.com.

Step 4 - Complete the certbot wizard
Return to the certbot wizard and press Enter.
Press Enter to Continue

Successfully received certificate.
Certificate is saved at: /etc/letsencrypt/live/myawesomedomain.com/fullchain.pem
Key is saved at:         /etc/letsencrypt/live/myawesomedomain.com/privkey.pem
This certificate expires on 2022-01-30.
These files will be updated when the certificate renews.

NEXT STEPS:
- This certificate will not be renewed automatically. Autorenewal of --manual certificates requires the use of an authentication hook script (--manual-auth-hook) but one was not provided. To renew this certificate, repeat this same certbot command before the certificate's expiry date.
The certbot outputs FOUR (4) pem files, which can be found in the path /etc/letsencrypt/live/myawesomedomain.com/. The certificate is valid for 90 days and cannot be extended (Let’s Encrypt’s policy).
cert.pem(required)privkey.pem(required)chain.pemfullchain.pem